Azure Managed Identities with Azure PowerShell Modules
Credential management is extremely difficult to handle securely and easily. Through this quick start guide you will see how you can succeed when facing this difficult problem!
What is a Managed Identity?
Within Azure you will need a specific identity to ever perform actions against resources. Commonly you would use your username and password to access these resources as yourself. The only issue is you may not want to own that process forever, or your password may need to be reset, or maybe you have authorization to a lot more resources than needed for the use case.
Azure Active Directory (AD) Managed Identity provides principals that can authenticate independent of yours or anyone else’s user account and credentials. This means the Managed Identity can have authorization very explicitly to only what is necessary for the specific functional use case. The credentials a Managed Identity uses don’t need to be written down or remembered by anyone either. A Managed Identity is also associated with a specific Azure resource, like a Virtual Machine (VM) or a Function.
Prerequisites
You will need a few pieces already in place before you can dive into making this work:
- Familiarity with Azure and PowerShell
- Azure AD tenant
- Azure Subscription
- Azure Resource Group
- Azure VNet
- Azure VM with Windows Server operating system
Getting Started
Configure Managed Identity
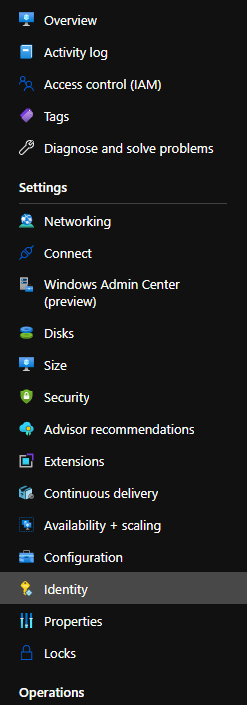
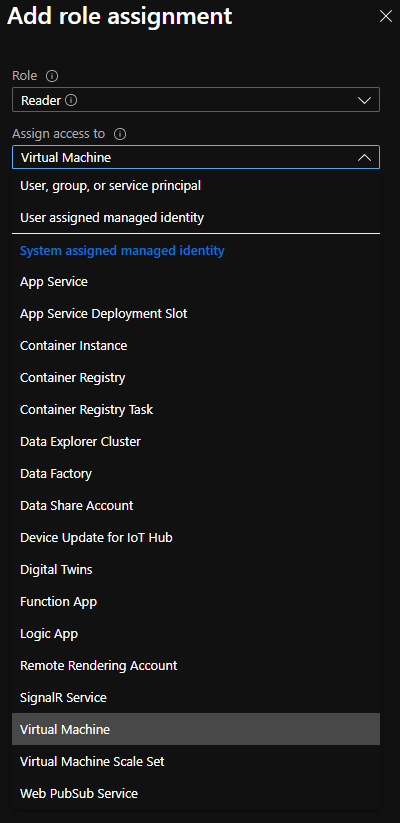
Within your existing Windows Server VM Resource, navigate to the Resource Menu on the left side. Within the Resource Menu, you will see an entry for Identity. Within the Identity Settings Blade, you will see a tab for System assigned and User assigned. The System assigned is what you are looking for. User assigned identities can provide you additional benefits for different scenarios but require more management. Set the Status to On and Save the settings to proceed. You will now see the identity as an assignable member of Azure AD Roles when you choose to assign access to a Virtual Machine.
 |
 |
|---|---|
| Azure VM Resource Menu with Identity Settings selected. | Azure Role Based Access Control Add role assignment blade with Assign access to Virtual Machine selected. |
Using the Identity
Now your Windows Server VM has an identity you can use to authenticate with Azure AD and authorize it to take actions on Azure resources. Since this identity does not have credentials in the sense of a shared secret or a password you will need to get a temporary token to use. The temporary token you will use is a bearer token.
Bearer tokens are a short lived credential that you as an authenticated identity receive to use when accessing specific resources. In your case with Azure, you will be working with JSON Web Tokens (JWT) that are Base 64 encoded to create bearer tokens.
Within your VM you can get a bearer token by requesting one from the Azure Instance Metadata Service (IMDS). The Azure IMDS is a Representational State Transfer (REST) Application Programming Interface (API) that provides context relative to the instance the request originates from.
With the following PowerShell code you can request a bearer token from the Azure IMDS for the Managed Identity of the VM.
$response = Invoke-WebRequest -Uri 'http://169.254.169.254/metadata/identity/oauth2/token?api-version=2018-02-01&resource=https://management.azure.com/' -Method GET -Headers @{Metadata="true"} -UseBasicParsing
The Invoke-WebRequest command will perform a request to the supplied Uniform Resource Identifier (URI). The URI will include a query string parameter for a resource, which is the scope you want to use the bearer token with. You will perform the request as a Hypertext Transfer Protocol (HTTP) get method, include additional HTTP headers, and to use basic parsing. The HTTP response received from the server will then be held within the $response variable.
The content of the response will be JSON and will include two properties you will need. The bearer token as the access_token property and the unique account identifier as the client_id property.
Basic parsing has become the default within PowerShell Core.
With the following PowerShell code you will extract the bearer token and the account identifier to their own variables.
$bearer=($response.Content|ConvertFrom-Json).Access_Token
$account=($response.Content|ConvertFrom-Json).client_id
You will be working with the Azure AD PowerShell module for this quick start and the module will also need you to supply the tenant identifier you want to connect to. The tenant identifier can be obtained in multiple ways. You will see two options. The first will show you obtaining the tenant identifier from the tid property of the decoded JWT. The second will show you obtaining the tenant identifier through an additional API request.
$tenant=([System.Text.Encoding]::ASCII.GetString(
    [System.Convert]::FromBase64String(
        (($response.Content|ConvertFrom-Json).access_token).split(".")[1]
    )
)|ConvertFrom-Json).tid
$tenant=((Invoke-WebRequest 'https://management.azure.com/tenants?api-version=2020-01-01' -Headers @{"Authorization"="Bearer $armToken"} -UseBasicParsing).Content|ConvertFrom-Json).value.tenantId
Now you can simply use these variables to connect to different modules or APIs directly. The following shows using the variables you created with the Azure AD PowerShell module.
Connect-AzureAD -TenantId $tenant -AccountId $account -AadAccessToken $bearer